(backup from Coticule.be)
Coticule use in a Progressive honing setup
Last updated on: 2011-03-02 00:01
Preface.
Honing is often thought upon as sanding. In a way, that is correct. Both rely on abrasion. Yet the comparison doesn’t fit all the way. Sanding is mostly used as a means to condition a surface, while the purpose of honing is to condition the edge where two of such surfaces meet. We will explore in this article why that isn’t quite the same.
“Progressive” means that the bulk of the steel removal is done with aid of a fast, yet coarse – or even crude – sharpening stone and that we subsequently progress through a number of increasingly slower and finer-grained whetstones, that allow better edge definition. The number of hones is arbitrary. Some use many small step-ups. Others choose to take larger jumps.
The choice of the first hone in the progression and to know when to step up to the next hone are both key to success. Progressive honing is a proverbial chain: if one shackle is weak so will be the entire chain.
The first step is an important one. The faces that define the cutting bevel of the razor might not be completely flat. The angle might be different. Their might be damage present in the form of missing chips or corrosion. All issues that need to be dealt with on a hone capable of doing the necessary steel removal within a reasonable time frame.
This is often referred to as “bevel setting”, although we prefer the use of term “bevel correction” on www.Coticule.be.
On a razor that dulled from normal use, a Coticule is apt to accomplish that task. You’ll find a complete description of a suggested practical method further down in this text.
For actual “bevel repair”, when chips are missing from the edge, that are obviously visible to the naked eye, or when other severe problems need to be dealt with, the use of coarser synthetic hones is called for, ranging from 200 to 600 grit. This kind of restoration work falls beyond the scope of this text. It will be addressed in a future article. For now, let’s suffice to say that a Coticule can easily deal with the scratch marks and typical edge condition left by a 600 grit synthetic waterstone. Coticules by themselves cannot be given a grit rating, as explained here.
There are many brands and types of synthetic hones, all very suitable for bevel correction. Cerax, Tiger, Shapton, Naniwa and DMT, just to name a few common brand names, all offer hones ranging between 1000 and 2000 grit on the manufacturers spec charts, which is about right to accomplish clean and straight bevel faces within a reasonable time frame.
It is important to realize that all of these hones will leave a fine sawtooth pattern at the very edge, that helps with severing hair. If we also want a razor that’s nice to the skin, we’ll need to loose those teeth further up in the honing progression. Coticules don’t produce a sawtooth pattern, hence the complete bevel off a Coticule will appear less efficient than that off a synthetic hone, simply because it caries no teeth to penetrate the outer layers of a hair shaft. There’s no need to worry about that. Simply something to bear in mind when assessing the completion of the bevel correction stage.
Which brings us to a crucial question: how to know when the bevel correction stage is completed.
To Test or Not To Test?
The easiest method is to start out with a razor that fails to shave your arm hair. Even razors that perform poorly for shaving a man’s beard, usually still remove the thinner hairs at one’s arm with ease. When we remove this shaving ability in the slightest of ways, by running the edge over a glass surface, we know with absolute certainty that the edge will not shave arm hair again before the bevel faces are completely flat and extending fully. A second advantage is that small blemishes accumulated by edge deterioration, will be gone. Our new edge will live in fresh and non-compromised steel.
Simply drag the razor over the neck of a beer bottle or some other glass object, edge down, only bearing its own weight. One passage is generally sufficient, but if your arm hair is really eager to fall, you might need to repeat it once or twice.
Those who are uncomfortable with dulling a razor, however slightly, prior to sharpening it, can rely on a combination of other edge assessment tests as elaborated in this article by David Polan.
Bevel correction on a Coticule.
A Coticule contains garnets for abrasive medium. When we moist the Coticule’s surface and rub it with another piece of Coticule, garnets are released into the water. The resulting abrasive milk, greatly enhances the abrasive action of the honing. For this purpose, most Coticules are sold with a small “slurry stone” to raise the abrasive milk. For bevel correction purposes we cannot do without it.
Raise the slurry to the aforementioned milk-like consistency and commence with the use of half strokes. (refer)
Perform about 30 laps on either side of the razor and probe with the TPT or TNT for progress. If you don’t know how to read the those test, you can also check if the razor shows any sign of responsiveness to shaving arm hair. Repeat the 30 laps on either side over and over again, and keep checking for progress. You may have to repeat this 2 to 20 times, depending on the initial condition of the razor. If it takes a long time, watch the width of both bevel sides. If they start showing unequal width, spend extra laps on the narrowest side. Once the edge gives a “sticky” response to the TPT or TNT along its entire length, or if it starts shaving arm hair, you can finalize the bevel correction stage by performing 30 full X-strokes. Do not allow the slurry to become too dense, because this has a negative influence on the sharpness that can be reached off the slurry stage on a Coticule.
The edge is now ready for refinement on the next hone in your progression. If you want to upsurge the keenness off the Coticule, before stepping up, you can perform about 50 additional laps on a thinned “misty” slurry. Results varying between different Coticule specimens, your edge will now be able to provide a mediocre shave. You can either divert to the Unicot or Dilucot method to get more keenness, or you can progress to a fine synthetic hone in the 8000 to 12000 grit range. After that it’s still possible to finish the edge on the Coticule, water only this time, to enjoy the gentleness of the renowned Coticule edge.
Refining the edge on synthetic water hones.
Let’s deal with a stubborn fallacy first. “smoothness” of a razor’s edge is not peripheral to that edge’s keenness. It sometimes advocated that finer hones do only offer better “glide” across the skin without adding extra keenness to the razor. This is an abominable oversimplification of the physics of sharpening.
Let’s elaborate.
For the sake of comprehending what’s going on at the very apex of a razor’s edge, we need to agree on a few linguistic choices. “Sharpness” defines how well an edge performs. For our purposes, three factors contribute to sharpness.
- 1. the angle at which both sides of our cutting bevel meet. A hair get severed by forcing a wedge in between the cells. It is clear that the enclosed angle of the wedge influences the force needed to penetrate. Basically, this choice is made for us by the razor’s manufacturer. We can make minor changes by beefing up the spine of the razor with a few layers of tape, but that falls beyond the scope of this text.
- 2. the width of the line were both sides of the cutting bevel meet. We will refer to this as “keenness”. The cleaner and smaller this region the easier our cutting wedge will force it’s way into the hair shaft.
- 3. the presence of teeth. If the meeting line between both bevel sides caries a pattern of teeth, the edge will cut more aggressively and appear sharper at the same keenness. This happens because the actual cutting force is concentrated at the spear-like protrusions instead of spread over the cutting wedge. Once the teeth have punched through, the rest of the wedge follows easily. Unfortunately, these teeth have a tendency to also grab skin cells easily and for a soft, irritation-less shave, nothing beats an edge that doesn’t carry teeth.
Coticules with their fairly large but very rounded and shallow cutting garnets, are unrivaled for creating clean toothless edges. That also explains while Coticule edges need ample keenness in order to shave well. As a result, an edge coming off a synthetic hone in the 1000 grit range appears sharper than that off a Coticule with slurry. In the picture on the left you can compare a Coticule-with-slurry edge to that off DMT-1200 grit. The sawtooth pattern of the DMT is pretty impressive. This edge feels incredibly sticky to the TPT and passes a hanging hair test with ease. It will shave well enough, but your skin will not be grateful. The edge of the Coticule-with-slurry also shaves, albeit with considerable pull on the whiskers. Both edges really lack keenness for comfortable shaving and need further refinement.
The progressive steps typically follow a “doubling” regime, hence: 4000 grit – 8000 grit, or 5000 grit – 10000 grit. Slightly bigger steps, such as 3000 – 8000 can work too, but they require some additional work on the hone that takes the big leap.
Refining the edge on the Belgian Blue Whetstone.
For reasons still unclear (although there has been speculation), when honing on slurry, the BBW maxes out at a keener level than most Coticules. It may strike as odd, but a very successful honing paradigm uses a Coticule with slurry to establish a good bevel (or any other bevel-capable hone, for that matter). Next the edge is refined on a BBW with a light slurry and finished on the Coticule with plain water. The resulting edges shave very well. Recently, it has been discovered that the BBW has excellent finishing properties of its own, hence refinishing on the COticule might not be necessary
Conclusion.
Coticules are multipurpose. Even without the use of special methods such as proposed in the Unicot and Dilucot methods, Coticules can be used with slurry for bevel correction purposes, at the first stage of a progressive honing effort. The same stone will at the same time excel at the final step of lending the edge the famous Coticule feel and smoothness.
The challenging part lies in the zone between the perfected bevel and the keenness required for successful finishing. In a progressive honing setup that centers around the use of a Coticule, we use other hones to fill that void. There are countless options.
Illustrations
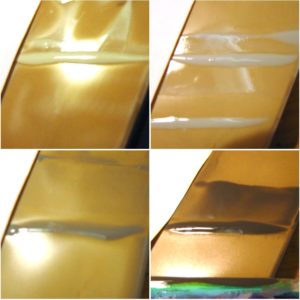
shows the darkening of the slurry as steel particles enter the mixture during a serious bevel correction job
Raising slurry VIDEO on Youtube
Slurry generation capabilities vary on different Coticules. This video shows how to create a thick slurry for doing heavy bevel work on a Coticule specimen that is noteworthy resilient in releasing garnets. Yet, as shown, with some extra persuasion a thick slurry can be obtained. Please beware that for regular use a milklike slurry is best. This stage is reached at the first “touch check” in the video.