(backup from Coticule.be)
Last updated on: 2012-02-12 23:16
Honing Wedges
Wedges take a bit of a special place in the world of straight razors. They are not hollow ground, or, in most cases, only very little hollow ground. In historical terms, wedges are predecessors of truly hollow ground razors. But that does not mean they are obsolete. In a way of speaking, wedge style razors are the SUVs (sports utility vehicle) in the world of straight razors. With their greater weight and momentum, they feel at home in a wilderness of thick, stubborn beard grow, preferably several days, or even weeks old. Compared to their singing full hollow nephews, they hunt whiskers in silence. They don’t stall easily, and that counts as much for severing whiskers as for slicing skin when wielded without proper attention.
Wedges are notorious for being difficult to sharpen. Which brings us to the scope of this article.
A challenge
Let’s look at it this way. Sharpening is nothing more than removing material of both sides of a piece of steel till the keenest possible V-shape is reached. On a full hollow razor, most of the steel removal is already done at the factory, what remains is a thin blade that quickly sharpens. On a wedge, we need to remove most of the steel ourselves. That obviously takes more work, but there’s a second principle at work to make life difficult. Wedges have broader cutting bevel sides, as the first illustration in the left column clearly shows. The honing pressure is spread over a significantly wider surface area, which slows down the process considerably. We cannot push down on the razor to compensate, just like that, because the very far part of a razor edge is extremely thin and flexes easily. Certainly during the finer stages of sharpening, pressure must be kept on a tight leash.
On many vintage – pre 1900’s – wedges it pays to inspect the blade well and perform some measurements. Let’s address a possible problem:
geometrics of the razor, notably bevel angle in “untaped” condition.
The way these old wedges were produced shows much wider variety than typically found on more modern incarnations of the straight razor. Upon measuring spine thickness and blade width, and the subsequently calculation of the bevel angle when we would hone the wedge with its spine touching the hone, we can find pretty large deviations of the bevel angle, even along the length of a blade. Anything in between 9 degrees and 22 degrees seems possible. Most modern razors center around 17 degrees, and that is not a coincidence. This value plus or minus a degree or two seems to deliver the best compromise between edge durability, shaving comfort and ease of sharpening. On a wedge that has a notably low angle it always pays to hone with a few layers of tape attached to the spine. In the left column of this page you can download a small Excel file that makes life easy. If you enter spine thickness and blade width, along with a value for the thickness of your tape, it calculates the “naked spine” angle, but also the resulting angles when up to 4 layers of tape are added to the spine.
How to proceed, depends a bit on the “wedgeness” of the wedge. On true wedges and nearly true wedges, it may be helpful to add as much tape as possible without surpassing 20 degrees. On wedges that have enough hollowing to approach the characteristics of a quarter hollow ground blade, you can suffice to aim for 17 or 18 degrees.
To Tape Or Not To Tape?
The reason to plea for the use of tape when honing wedge style razors, is because tape adds more clearance between the blade and the hone. This allows for a narrower bevel with cleaner boundaries. It not only looks better, but is also easier to sharpen and to maintain. Let’s look at the second illustration in the left column. We see an exaggerated representation of irregularities in the grind of a razor. Honed without tape, there is only a very shallow angle between the hone and the body of the razor. As a result the slightest imperfections show up as an amplified curve in the boundary of the produced bevel. With a slightly raised “taped” honing angle, we can see a clear improvement in straightness of the boundary and a narrower bevel.
A word of caution: while tape – as long as we stay below the 20 degrees threshold – adds the benefit of cleaner and narrower bevels, we must pay careful attention to the attachment of the tape. (see the third illustration) On hollow ground razors, tape folds around the spine, beefing it up without much demand for symmetry of application. With wedges we have to pay closer attention: the razor often rests on the rim of the tape and that calls for very symmetric application. Results may very well vary depending on the width of the chosen tape.
The easiest way to apply tape in a balanced manner, is to put the piece of tape, glue-side up, on the table and aim the blade, edge up, precisely in the middle of the tape. Lift the razor with the tape up and fold both sides around the spine. Repeat for every additional layer.
Secondary bevel
Wedges are great candidates for the creation of a secondary bevel. Especially – yet not exclusively -, on our beloved Coticules, all the benefits of a secondary bevel are fully unleashed. Those benefits are:
– excellent keenness can easily be reached on the narrow bevel.
– secondary bevels are unaffected by unevenness in the grind of the wedge, since those issues are equalized by the primary bevel.
– much better response for sharpness maintenance touch ups on a Coticule with water only.
The procedure is fairly straightforward: perform steps 1 to 4 of the Unicot method with the required layers of tape for optimal bevel angels, minus one. Next, add the final layer of tape and take the razor through steps 5-7.
Stropping
Obviously, you will use and strop your wedge style razor without tape attached to the spine. When the edge was hone with only one or two layers raising the spine, there is no need for special measures while using a hanging strop. If you used three or four layers, you need to slacken the strop by a very small amount. For stropping on pasted paddle strops the general consensus is to leave the tape on.
Illustrations – Click image for full size
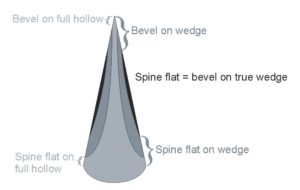
Bevel width correlates to hollowness

exageration of bevel uneveness at low angle
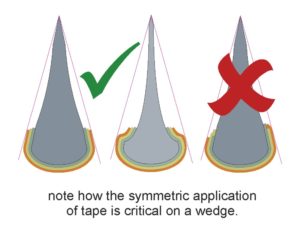
application of tape